
JLR Head-Up Display Retrofit
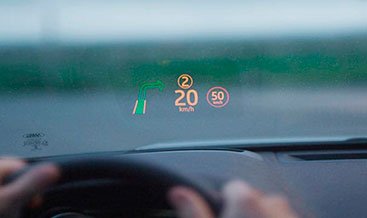
The moment a driver glances down at the instrument cluster, the vehicle travels blind for approximately 50 metres at motorway speeds. The head-up display retrofit eliminates that distraction by projecting critical information directly into the driver’s forward field of view. The genuine JLR head-up display places vehicle speed, navigation turn arrows, gear selection, adaptive cruise control status, and traffic sign recognition alerts as a crisp, full-colour virtual image that appears to float approximately two metres ahead of the windscreen. Drivers who experience the head-up display quickly consider it indispensable for high-speed driving, complex junctions, and unfamiliar routes.
The Engineering Behind the JLR Head-Up Display
The head-up display system centres on a high-resolution projector module housed within the dashboard. A matrix of TFT LCD pixels generates a full-colour image that reflects off a sequence of aspheric mirrors before striking the windscreen. The mirrors correct for the curvature and angle of the glass so the virtual image appears sharp, undistorted, and correctly positioned regardless of driver seat height.
The windscreen plays an equally critical role. Standard laminated windscreens produce double reflections because the inner and outer glass layers create offset images. The genuine JLR combiner windscreen incorporates a wedge-shaped polyvinyl butyral interlayer that aligns the reflected images from both glass surfaces into a single, unified projection. Without the combiner windscreen, the HUD image suffers from ghosting that fatigues the eyes and compromises legibility. The retrofit includes replacement of the windscreen with the correct optical-grade part matched to the HUD projector.
The projector module communicates on the vehicle’s CAN bus. It reads speed data, gear position, turn-by-turn navigation instructions, and driver assistance statuses directly from the instrument cluster, navigation module, and forward-facing camera. The image updates instantly as conditions change, yet the brightness adjusts automatically through an ambient light sensor so the projection remains visible in direct sunlight and dims appropriately during night driving.
What the Retrofit Includes
| Component | Purpose | Vehicle Integration |
|---|---|---|
| Genuine JLR head-up display projector module | High-resolution TFT projector with aspheric mirror assembly, ambient light sensor, and tilt adjustment motor | Mounts to factory bracket points within the upper dashboard structure; connects to CAN bus and fused ignition feed |
| Combiner windscreen (optical grade) | Laminated windscreen with wedge PVB interlayer that merges reflection paths and eliminates double images | Bonded to body aperture using JLR-specified polyurethane adhesive; retains rain sensor, camera, and heating element compatibility |
| Head-up display control switch pack | Rocker switch for image height adjustment, brightness override, and display content toggling | Installs in the driver’s side lower switch panel or steering wheel spoke; connects via LIN bus to the instrument cluster |
| Dashboard trim panel (if required) | Upper dashboard cover with HUD projector cutout, anti-reflective mesh, and secure louvre retained to specification | Matched to vehicle interior colour code; retains airbag deployment path integrity |
| Wiring overlay and connectors | CAN bus twisted pair, ignition supply, and ground connections routed to the projector and control switch | Integrated into factory harness channels; uses sealed connectors at junction points |
Vehicles Compatible with the Head-Up Display Retrofit
The head-up display retrofit suits numerous Land Rover and Jaguar models that offer HUD as a factory option. The projector module, combiner windscreen, and dashboard trim vary between platforms. Correct parts selection ensures flawless integration:
- Range Rover L405 (2013‑2022)
- Range Rover Sport L494 (2014‑2022)
- Range Rover Velar L560 (2017 onward)
- Range Rover Evoque L538 (2012‑2019) and L551 (2020 onward)
- Discovery 5 L462 (2017 onward)
- Discovery Sport L550 (2015 onward) with digital instrument cluster
- Jaguar XJ X351 (2010‑2019)
- Jaguar XF X260 (2016 onward)
- Jaguar F‑Pace X761 (2016 onward)
- Jaguar E‑Pace X540 (2018 onward)
- Jaguar I‑Pace (2019 onward)
How the Installation and Coding Process Works
- Pre-installation assessment. The technician confirms the vehicle’s instrument cluster supports HUD video output and verifies the navigation module operates at the correct software level. A diagnostic scan captures the current Central Car Configuration and module network topology for reference.
- Windscreen preparation. The existing windscreen is removed using induction cutting tools that protect the aperture flange and paint finish. The bonding surface is cleaned and primed to the JLR body repair specification.
- Dashboard integration. The upper dashboard is partially removed to access the HUD mounting bracket. The projector module bolts into the factory mount points. The wiring overlay runs along the instrument panel cross-car beam and connects at the CAN junction behind the instrument cluster.
- Control switch installation. The HUD adjustment switch fits into the vacant position on the driver’s lower switch panel. The LIN bus connection integrates with the existing switch matrix.
- Combiner windscreen bonding. The new optical-grade windscreen is bonded into the aperture with the correct adhesive bead profile. The curing time meets JLR’s specified minimum before the vehicle moves. The rain sensor, forward-facing camera, and heating element reconnect to their respective modules.
- Remote CCF coding. Our engineer connects via DoIP and enables the head-up display in the Central Car Configuration. The coding writes the HUD module identity, activates the driver preference menu option in the instrument cluster and touchscreen, and calibrates the projection default height and tilt values. The instrument cluster configuration updates to reflect the presence of HUD video output.
- Validation and image calibration. The technician verifies the virtual image clarity across the full adjustment range. Speed readout and navigation prompts appear without ghosting or distortion. A diagnostic report confirms all modules communicate without faults and the CCF checksum is correct.
Frequently Asked Questions
Does the head-up display show navigation instructions?
Yes. When the vehicle’s navigation system calculates a route, turn arrows, junction lane guidance, and distance countdown information project onto the windscreen. The system reads this data from the factory navigation module. Vehicles without factory navigation still display speed, gear position, cruise control status, and traffic sign recognition data where the forward-facing camera supports that feature.
Will the HUD work with polarised sunglasses?
Polarised lenses attenuate the reflected image because the HUD light undergoes polarisation when it strikes the windscreen at an oblique angle. The image dims but typically remains legible. Tilting the head slightly restores full brightness. Non‑polarised sunglasses do not affect the display.
What about the windscreen replacement process and ADAS recalibration?
The combiner windscreen replacement follows the same body-shop standards as any JLR-approved glass replacement. After bonding, the technician recalibrates the forward-facing camera and rain sensor using diagnostic equipment. The lane departure warning, automatic emergency braking, and high beam assist functions undergo a static and dynamic validation to confirm correct operation through the new windscreen.
Can the driver adjust the HUD image position?
The control switch pack provides height adjustment and brightness override. Height adjustment raises or lowers the virtual image within the visible field to accommodate different driving positions. Brightness control allows the driver to increase or decrease intensity relative to the automatic ambient light sensor baseline. The preferences are stored in the driver’s personal profile and recall automatically with the seat memory.
Arrange Your Head-Up Display RetrofitEach head-up display retrofit is supplied with the genuine JLR projector module, optical-grade combiner windscreen, control switch pack, correct dashboard trim, and a complete wiring overlay. The remote coding session activates the HUD in the Central Car Configuration and calibrates the image projection parameters. The result is a factory‑correct head-up display that reduces driver distraction, enhances situational awareness, and elevates the driving experience to one where essential information never demands a glance away from the road.